In this tutorial i will teach you some easy steps to add an image as blogger background. Many people love to add their own image as blogger background, you can add any image using these simple steps :
- Select/download from your PC or Internet.
- Upload it to Picasaweb, Photobucket or Blogger.
- Adding this uploaded image as blogger background.
Step1: If you want your image to add as a blog background then just select it from your PC or wherever you have stored it on the web.
- And if you want to use any other image then just download it from the web or you can use the background patterns provided by the sites like Din Pattern , Subtle Patterns etc.
Step2: Now here i am using
Picasaweb to show you how you can upload your image to
Picasa and then using the link of the image for adding that image as blogger back ground.
- first of all log in to Picasaweb account using your Google account id and password.
- second upload the image.
 |
| To Enlarge the image please click on image. |
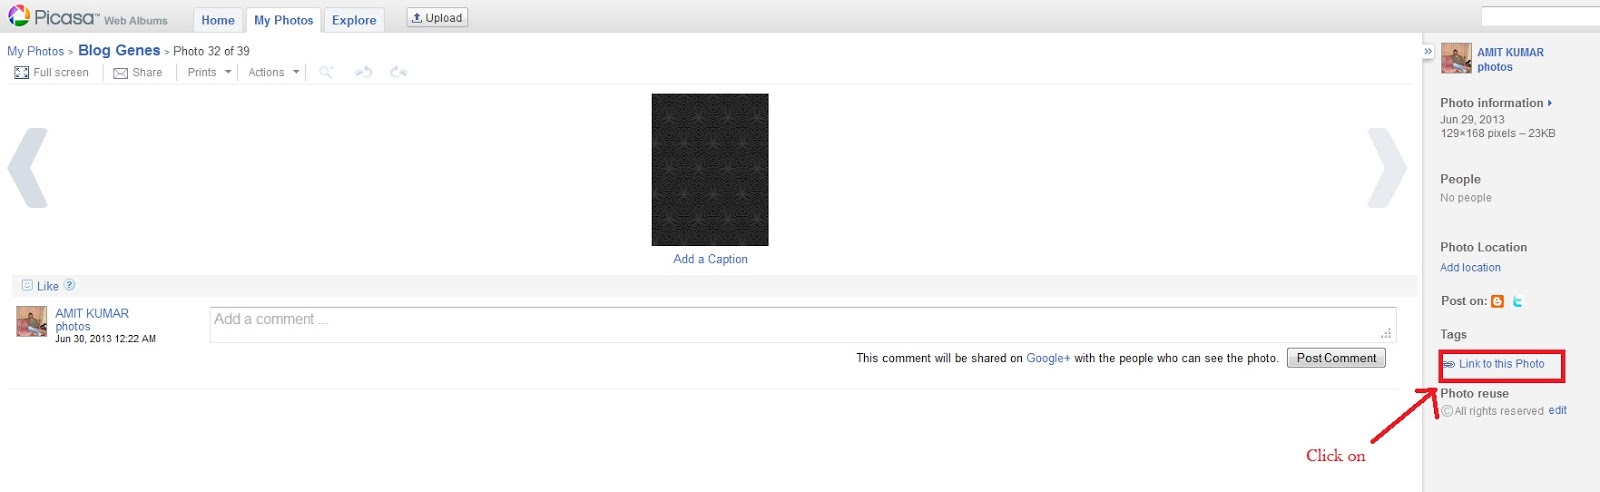
- Go to the album in which you have uploaded your image, select the required image and copy the URL of the image.
 |
| To Enlarge the image please click on image. |
 |
| To Enlarge the image please click on image. |
 |
| To Enlarge the image please click on image. |
 |
| To Enlarge the image please click on image. |
Step3: Login to your blogger account, go to Template section by clicking the "Template" tab.
 |
| To Enlarge the image please click on image. |
- then click on the "Customize" tab.
 |
| To Enlarge the image please click on image. |
- Now, search for the Advance tab which is present on the top left corner of the window. Click the tab and you will find an add custom css section where you have to copy and paste the following code with your image URL.
body { background: url("URL of the Image"); background-color: none; }
.body-fauxcolumn-outer div { background: none !important; }
If you're using a pattern then the above code will work great. However, if you're using a big image then you need to take care of the alignment as well. The code for an image will be something like this:
body { background: url("URL of the Image") no-repeat scroll top left; background-color: none; }
.body-fauxcolumn-outer div { background: none !important; }
 |
| To Enlarge the image please click on image. |
- Now, click on "Apply to Blog" tab present on the top right corner of the window and you are done.
Some Tips:
There are 4 things in the code above, let me introduce them to you.
1- no-repeat
It makes sure that the large image doesn't repeat itself. You can change it to
repeat if you want to repeat your background image.
2- scroll
You
might have noticed that the background image also moves when you scroll
down your blog. If you want the background image to stay still in the
background then you can change
scroll to
fixed.
3- top
Top is indicating the vertical positioning of the background image. You can change the vertical positioning to
center or
bottom.
4- left
Left is responsible for horizontal positioning of your background image. You can also change this value to
center or
right.
Final Thoughts:
I've
tried my best to make the HTML and CSS stuff easy for you guys.
however, if you still feel any difficulty, feel free to leave me a
comment.


0 comments:
Post a Comment