Showing posts with label Blogging. Show all posts

Sunday, 8 March 2015

5 Best Sites To Compress Images Online

In blogging we always try to upload high quality images to our blogs so that we can make them attractive but at the same time we want our images to be smaller in size so that they do not affect our website/blog speed. A website with heavy images loads slowly and as a result, it ruins the user experience. In my earlier days of blogging i did not focus on image optimization but by the time i came to know the importance of image optimization and therefore i started optimizing images for my website to make it fast loading and to enhance the user experience. So, from then i always compress images before uploading them to my blogs. I use some sites which provide image compression and optimization tools that today i am going to share with you.

These sites provide effective tools to compress images. Their tools use advanced algorithm that maintains a balance between optimization and lossy compression so that they reduce the images to smallest possible size while maintaining the required level of quality at the same time.

So, below are some best sites on which you can compress your images:

TinyPNG/TinyJPG:

TinyPNG/TinyJPG is a great site where you can compress your PNG and JPEG files. TinyPNG uses smart lossy compression techniques to reduce the file size. It basically decreases the number of colors in the images to reduce their size. The resulting compressed image is almost same as the original image but the difference in file size is huge. TinyPNG's advanced lossy compression technique also preserves the full alpha transparency for PNG files. It also provide its plugin for WordPress users.

Site Links: 
  • http://tinypng.com
  • http://tinyjpg.com

Compressor:

Compressor is another great site that you can use to compress and optimize your image with up to 90% of file size reduction. Compressor also offers a powerful tool to drastically reduce the file size whilst maintaining a high quality image with almost no difference in image before and after compression. Compressor supports 4 different file formats, which are PNG, JPEG, GIF, and SVG. Another thing that makes it different from other online compression tools/sites is that it offers two types of compressions - one is lossless compression, which almost preserves the quality and transparency of images, and other is lossy compression, which also preserves quality and transparency but the compression is mainly focused on higher reduction of file size.

Site Link:
  • http://compressor.io

Optimizilla:

Optimizilla is another great online image optimizer where you can compress your images while preserving quality of images. Optimizilla is specially designed and developed for web developers and publishers so that they can better optimize images for their sites or projects. It provides full control over image compression. You can select the number of colors to reduce the file size and to maintain the quality. It provides a slider through which you can maintain the quality of your images. It only supports PNG and JPEG file formats.

Site Link:
  • http://optimizilla.com

CompressPNG/CompressJPEG:

CompressPNG and CompressJPEG are sister sites of Optimizilla. These sites are also good in compressing images as well as in maintaining quality of images but they do not provide full control like Optimizilla. You can simply upload files on CompressPNG or CompressJPEG and it will provide you a compressed image with preserved image quality.

Site Links:
  • http://compresspng.com
  • http://compressjpeg.com

Smushit:

Smushit is an image optimization service by Yahoo. Smushit uses optimization techniques to remove unnecessary bytes from the image files. Smushit is a lossless tool, which means it optimizes the images without changing their look or visual quality. Since it is mainly focused on preserving the quality of images so it does not reduce much file size as compared to lossy compression tools. But, you can use it if you don't want to loose quality of your images.

Site Link:
  • http://smushit.com
Some Other Interesting Stuff:

How To Check The Speed Of Blog/Website

If your website is loading slow or it is taking more time than regular then its time to fix it by analyzing your website speed and finding out the issues which are causing/ may cause delay in loading. Webmasters always try to focus on each and every issue regarding their websites to enhance the user experience. Few days back i installed a script on my website that was creating delay in load time. I always try to make my site better and user friendly, so, that was the issue that was hurting me and therefore i decided to find out a service that can analyze my website for speed and issues regarding it.

While searching for the free services that can analyze my site i came to know about a service which is offered by Google, so that webmasters can fix their websites to provide better user experience to their website visitors. This service by Google not only analyzes your website for speed but also guides you and provides the various solutions to fix your issues. It shows separate analysis report for mobile traffic and desktop traffic, so, you can fix issues for both traffic in one go. It also provide some advanced tools that you can use to better analyze and fix your site. The advanced tools are little difficult to understand for normal users but their basic tools are enough to maintain your site.

Below i am providing step by step procedure to check the speed of your website.
  • Go to Google Developers Speed Analysis Page.
  • Under Page-Speed click on Analysis then select Insights from the list.
  • Then enter your website URL or any specific page URL and click on Analyze Tab.
  • Now you can see the speed score for both desktop and mobile devices.
  • Also, you can see the errors and solutions to fix them.
Some other interesting stuff:

Friday, 3 October 2014

Why Webmasters/SEO Blogs Rank High In Alexa ?

We always discuss about ways to improve Alexa rank of our blogs/websites but have you ever noticed that why webmasters/SEO blogs rank high in Alexa rankings even if they receive lesser traffic than any other blog, website which receives more traffic. This is the question that many people ask because Alexa rank is a factor that many advertisers see before advertising on any website and also many ad networks require a good Alexa rank to approve a website to use their network.

We may or may not consider Alexa rank as an important factor for our blogs, website but the thing is it is somewhat important because many people around the web give it some importance. High ranking in Alexa could gain interest of the users and people will enter your blogs, website with more confidence if they see that your blog/website has high Alexa Rank. To know more about the importance of Alexa rank, you can follow the below link:
Alexa rank sometimes disappoint some blog and website owners because their blogs, websites rank low in Alexa while other blogs, websites which have lesser traffic have high Alexa rank. So, in this case Alexa ranks becomes a controversial issue but i would say, it will not create any controversy if you know how Alexa works actually. So, to better understand this lets first discuss about the working of Alexa and how it decides rank of a blog/website.

How Alexa Decide The Rank Of A Blog/Website ?

Actually Alexa considers various factors to decide rank of a blog/website such as website traffic, number of page-views, time spent on different web pages, unique visitors, back links, visitors location, age group, domain level that is whether it is a top level domain or sub domain etc. and on the basis of past three months data it decides the rank of blog/website.

But besides all these factors the most important thing that many people forget to tell about Alexa is that to decide the rank of a website/blog, the blog/website must be visited by a web browser that have Alexa toolbar installed in it. That means Alexa only counts those visitors that have Alexa toolbar installed in their browser. Now i think you have got your answer if not then continue reading.

Why Webmasters/SEO Blogs Rank High In Alexa ?

Webmasters/SEO blogs rank high in Alexa because they are visited mostly by the visitors who are looking for SEO tips, gadgets, blogging tips etc and most of them know about Alexa. And therefore they have already installed Alexa toolbar in their browsers. In short their blogs/websites are mostly visited by the professional traffic because of their blogs/website niche. So if your blog/website doesn't rank good in alexa even after having good traffic then this may be the reason behind it. However, if you want to improve your blog/website then you can follow the below links:

Tuesday, 9 September 2014

How To Get Visitors Engaged In Your Blog/Website?

Engaging visitors in your blog is an effective strategy to increase the number of page views of your blog/website. Generally visitors comes to your blog with a motive to get something by searching some keyword on search engines or else if your blog is well known then they could directly come to your blog for fulfilling their motive and after their motive is completed they leave your blog. So this is the thing on which we have to work on, because effective page views can help your blog to grow in various fields such as rankings, earnings, gaining the interest of visitors etc.

If your blog/website is getting high traffic but number of page views is not enough then your blog's bounce rate will increase and also you are loosing your blog's ranking as well as some money that some extra page views can generate for you. So in this article i will suggest you some ways that can help you to engage your visitors in your blog.

Below are the following things that you can consider to engage your visitors in your blog:

Create Attractive Titles For Articles:

This is the main thing on which you have to focus because an attractive title not only increases the number of page views but also increases the number of visitors on your blog/website. An attractive title always gets the visitors attention whether it is shown in your blog's related posts section, popular posts section or within an article as a link but it also gets the visitors attention on search results too. This is the most important thing, so always try to create attractive titles for your articles.

Build Confidence Of Visitors On Your Blog: 

You can build a healthy relationship as well as build the confidence of the  visitors on your blog by writing researched article. Researched articles are important because when a visitor search a specific keyword on search engines then he/she gets the various results so to make your blog different from other blogs try to write some researched articles so that visitors can understand that this is the blog where we can get the quality content and once they start believing in your blog then they first come to your blog rather than going to the search engines. In this way you will get a direct visitor plus your page views will also increase.

Interlinking:

This another very important step in the process, Interlink your article with one another. Try to give 4-5 links in an article but make sure they must help the visitor. Just giving any link which is not related to your content is not going to solve your problem. Effective interlinking not only increases the number of page views of your blog but it also helps in decreasing the Bounce rate of your blog. So if you don't know what bounce rate is then you can read this short article:
If your blog has low bounce rate then your blog will rank high in search engine results as well as in Alexa ranking. So try to provide best and most suitable links in your article.

Also Read:

Tell Your Visitors About Recommended Content On Your Blog/website ?

Nobody know your blog better than you, you know the best articles of your blog. So always try to tell your visitors about the recommended content on your blog. You can do this by adding a text "Also Read" or you can also use "Recommended Articles" to show the recommended contents on your blog. And if your post titles are attractive then visitors will definitely see some of your articles and this will reduce the bounce rate of your blog. So never hesitate to tell your visitors about recommended contents on your blog/website. Also if you are running a website which is providing some tools then you can recommend your visitors to use other attractive tools by quoting recommended tools, use our new tool etc.

Place Related Posts, Recent Posts and Popular Posts widget on your blog:

Always try to place at least any one of the above mentioned widgets because all three has their own importance and if possible try to use all three widgets because they can increase the number of page views by a huge margin. But the thing you need to consider is that always try to place attractive widgets that can get the visitors attention and do not harm your blog. I am saying this because some related posts widget providers site, gives you widgets that soaks your link juice. Most of the people don't know about this so let me tell you in brief.

Some Related Post Provider sites like Linkwithin.com and Outbrain.com provide related posts widget for free but their widgets soaks the link juice. After placing their widget on your website/blog, you can see the related posts but whenever a visitor clicks on a related posts link then their widgets first redirects the visitors to their website just for a fraction of second and the again back to the destination page. Also they show their logo that you are using their widgets plus they do not offer more designs and customization. So try to avoid such widgets. So if you want a related posts widget that has various unique designs and doesn't soaks your link juice then you can read the below article where i have described which related posts widget to use for your blog/ website. Basically i have written that article for bloggers but the site that i have described in that article also provides widgets for various other platforms like Wordpress, Tumbler etc and provides JavaScript file for other platforms. So check out the below article for a fantastic related posts widget.
    Also if you don't want to loose much space of your blog then you can use on of the best recent posts widget on your blog. This widget doesn't take much space and shows the recent posts of your blog. Basically this is a news ticker that you can place above your posts to show the recent article. So you can give it a try too:

    Hide Some Articles, Widgets, Plugins, Tools:

    Not getting it from the heading so let me explain you, human are very curious to know the hidden things. In practical life you have seen that people are keep searching for new things, try to search the hidden things whether it is in field of science, art etc. Likewise if you hide some of your article or tool behind your links like : we have used this widget to solve our issue, or you can read this article to find out the solution etc. then this will generate the curiosity among to the visitors to know what is hidden behind that link and as a result you will get some additional page views.

    Place A Site Search Tool:

    Always place a site search tool in your blogs so that if a visitor doesn't gets the content in categories then he/she can search the site for the required content. This is also important because i have seen many visitors who do not bother to look at your categories or menu bar instead they use the search bar to search the required content so it a must have tool for your blog.

    Reply On Comments:

    Try to reply on users comment, this is not only important to develop a healthy relation with your visitors but also to increase number of page views. You can increase the number of page views by solving out the visitors problem by giving the links in comments section that can solve their problems. In this way you can get some additional page views.

    If you liked this article then please take a few seconds to share it on social networks ツ

    Also read:

    Friday, 15 August 2014

    How To Index Webpages Faster To Google ?

    Whenever we create a blog/website or a new blog post we want it to be indexed on Google as well as on other search engines as soon as possible. Although our posts and pages get indexed on Google in just one or two days but if you want them to be indexed as fast as possible then you can do it now by using a service provided by Google named as Google Webmaster Tools. Google webmaster tools is a free service provided by Google to webmasters so that they can maintain their blogs, websites.

    Mainly Google webmaster tools allows the webmasters to monitor the indexing status of their websites and helps them to maintain their site's presence on Google search results. It also provide additional facilities which helps you to analyze your site for any errors.

    Since Google webmasters tools has lots of features so discussing about each and every feature in single post is difficult. So here we only discuss about the crawling and indexing because we just want to index our webpages as soon as possible. So in this tutorial i will show you - How you can create a Google webmaster tools account, How to add a website to Google Webmaster tools, How to verify website ownership in Google Webmaster Tools, How to submit a sitemap in Google webmaster tools and How to index each and every webpage using Google webmaster Tools. So the first thing is creating a Google webmaster tools account.

    How to create a Google webmaster tools account ?

    Creating a Google webmaster tools account is as simple as creating a Google's account. However if you already have a Google account or if you are using Blogger as platform for your blog then you don't need to create a new account.

    But if you don't have a Google account then first you sign up for Google Webmaster Tools.
    Now i consider you have created a Google Webmaster Tools account, so our next step is adding and verifying our website.

    How to add a website to Google Webmaster Tools ?

    • Log in to your Google Webmaster Tools Account.
    • After log in to your GWT account you can see the red color ADD A SITE tab on the right side of your homepage as shown in screenshots below.
    • Click on ADD A SITE tab and enter the URL of your website.
    • Then click on Continue tab.
    • If you have a blogger blog that is your domain is not a top level domain and its extension is .blogspot.com and you have logged in to Google Webmasters account with same Google account that you are using for blogger then you are not required to verify your domain. It will automatically get verified. But if you have a top level domain then you have to verify your ownership of the domain.
    How to verify your ownership of website/domain in Google Webmaster Tools ? 

    Verifying your ownership of the domain/website is quiet easy in Google webmaster tools as it provides various methods to do it.

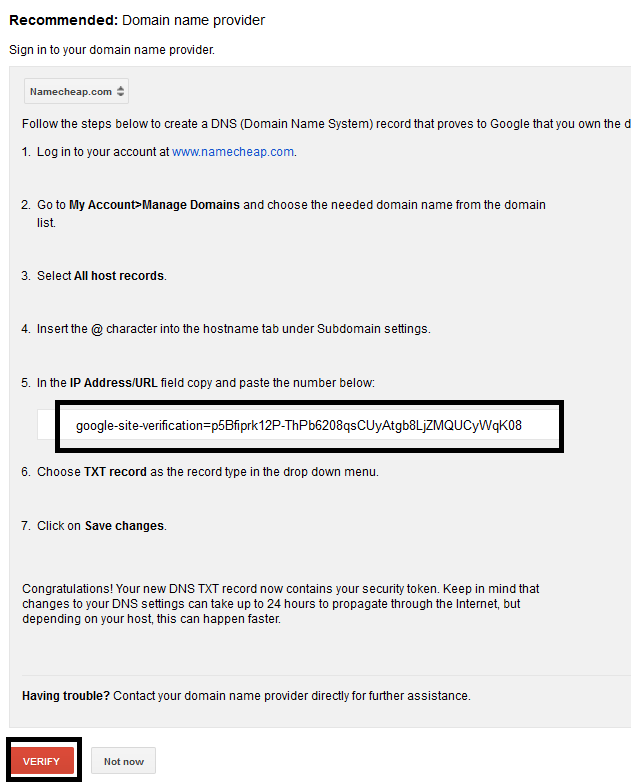
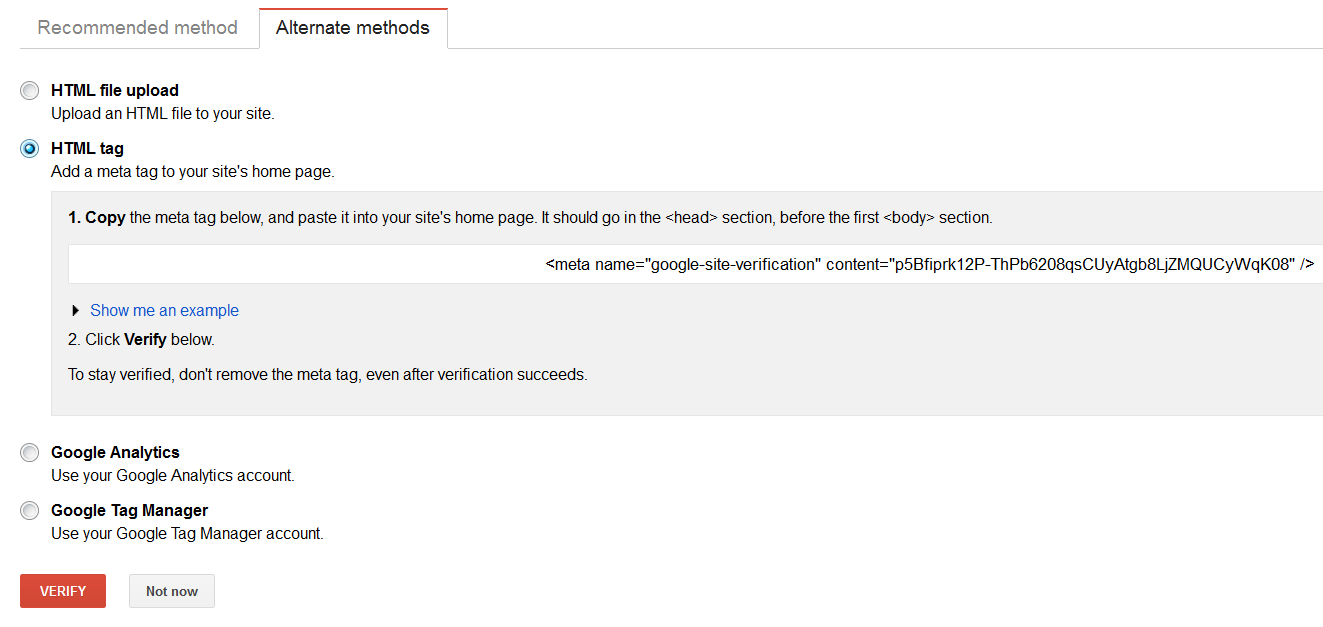
    Basically it will give you two different methods one is Recommended Method and other is Alternate methods as shown in screenshots.

    How to verify your website ownership using Recommended method in Google Webmaster Tools?

    • In this method simply you have to login to your domain name provider's site like Godaddy, Namecheap, Bluehost, Hostgator etc.
    • Then My Account >> Manage Domains and select the domain that you have to verify.
    • Then go to All Host Records.
    • Insert the @ character into the hostname tab under Subdomain settings in All Host Records.
    • Then in IP Address/URL field enter copy and paste the code given by Google as shown in screenshots. 
    • In record type select TXT record from the drop down list.
    • Then click on Save Changes tab.
    • Now again come back to Google webmaster tools verification page and click on Verify tab.
    • This will verify your ownership of the domain/website.

    How to verify your website ownership using Alternate method in Google Webmaster Tools ?

    In Alternate methods, Google webmaster tools provide you four different methods to verify your website ownership.
    • HTML file upload.
    • HTML tag.
    • Google Analytics.
    • Google Tag Manager.
    Since Google Webmaster Tools has already described these methods, so i don't think there is a need to describe it here again. These methods are quiet easy so you can select any one of them to verify your website ownership.

    Now as we have already created Google webmaster tools account and also verified our website ownership so now its time index our webpages. To index our webpages we have to first submit the sitemap to Google webmaster tools so it can index our pages faster. Also after doing this we can use Fetch as Google feature to index each and every webpage of our website. So first we discuss about sitemap:

    I think this post is getting lengthy so please click on the below links for the remaining tutorial:
    • How to submit a sitemap to Google Webmaster Tools ?  
    • How to index each and every webpage to Google ?

    Thursday, 14 August 2014

    How To Extract Text From Picture?

    As an internet user we always keep looking for good content for our various purposes such as projects, reports, for our blogs etc. Since i am a blogger i also keep looking for good content that i can use for my blog. Sometimes in quest of searching we get good content directly from a website and we simply copy it and use it wherever we want. But sometimes we get the required content but that is written on an image so it can't be copied directly. Generally this not a big issue as it looks like. Today we have various different methods to extract the written information from an image and one of which that is very common nowadays is using an OCR(Optical Character Recognition).

    Basically OCR is a technology that we can use to extract the information from an image, PDF files etc. So extracting the text from an image is not a big deal, you can do it easily both online and offline. Since there are many website present online that are providing Free online OCR service so that you can easily extract the text from your selected images or pictures. Also in addition to this if you want to extract the information from an image without using an online OCR then you can download a software for your own, as there are many software distributing websites available online that are providing the free OCR software that you can use offline to serve your purpose. I think i have given you the hint of what i am going to do in my next steps.

    Ways to extract the text from pictures:

    Basically there many ways to do this but in this tutorial i am going to show you the two methods to extract the text from an image, these are:
    • By using free online OCR service.
    • By using an OCR software offline.

    By Using Free Online OCR service:

    As i have already discussed that there are many websites available online that are providing the free online OCR service that you can use to extract the text from picture. I have found two best free online OCR service sites for you, these are:

    How to use these websites to extract the text from your selected image ?

    Using these websites is very easy as their user interface is quiet simple and effective. Also these sites don't take much time in extracting the text from picture. So first we start with Onlineocr.net:

    How to use Onlineocr.net ?

    • Open your web browser and enter www.onlineocr.net in the address bar and press enter.
    • Then the site will open up and it will show you that extraction of text from an image is a three step process.
    • First of which is "Upload file".
    • Simply click on Select file tab and select the image file (from which you want to extract the text) from your PC.
    • Then second step is "Select Language and Output Format".
    • So simply select any of the language as per your requirement. Basically select that language in which the content is written on the image. Then select the output format, it offers three different formats that is docx, xlsx and txt. So select the output format as per your requirements.
    • Then enter the captcha and click on Convert tab which is the third step.
    • Now in few seconds it will extract the text from picture and give it to you in your required format.

    How to use free-ocr.com ?

    The process is very similar to onlineocr.net, it is also a three step process:
    • Enter www.free-ocr.com in the address bar and press enter.
    • Upload image file using Browse tab.
    • Then select the preferred language.
    • Then enter captcha code.
    • Now click on send file tab and it will extract the text from image.
    • Simply copy the text and use it wherever you want.

    By Using An OCR Software Offline:

    This is our second way of extracting the text. If you have a large number of image files from which you have to extract the information then download a Free OCR software for yourself because it will save your time of again again visiting a website for just extracting text. So i have found one of the best OCR software that can serve the purpose without taking your much time and effort. The software i am giving is very small in size and very fast in extracting text from image so i think downloading and using it will nor bother you much. Here i am giving you the two download links from which you can download the Free OCR software.

    Link 1: Download Free OCR software from cnet.
    or
    Link 2: Download Free OCR software from softpedia.

    Now i think you have downloaded the Free OCR software, so lets start the tutorial.

    How to use FreeOCR software ?

    • After downloading and installing the software simply open it.
    • Then you will see two windows in the software, one for image and other for text.
    • From right side window remove all the text using Backspace tab.
    • Then click on Open tab and select the image file from which you want to extract the text.
    • Then select the area in the image from which you want to extract the text.
    • Now click on OCR and it will ask you "OCR current page" or "OCR all pages".
    • You can select any of the option as per your requirement. Since here i am using a single image so i am selecting "OCR current page".
    • After few seconds you can see the extracted text in right side window of the software.
    Posted on 14:16 | Categories:

    Wednesday, 13 August 2014

    How To Copy Text From An Image / Photo ?

    Searching for good content is always a messy thing, we work hard and try hard to find the best content for our blogs, projects, reports etc. Sometimes we get the desired content on some blog/website that we easily copy and use it for our required purpose but in some cases we search hard and get the content but the content is written on a photo, scenery or on a fancy image. If the content is less then we write it on our own but if the content is more and you don't want to write it then you definitely try to copy it but because it is in the form of an image so you can't copy it easily. So this tutorial is dealing with the same problem, here i will show you the way to extract or copy the content from an image / photo.

    So before starting the tutorial i would like to give you a brief description about what we are going to do in our tutorial. Basically here we use a software which is relatively small and quiet fast as well, that will extract the text from image/photo. This software is an OCR, the full form of OCR is "Optical Character Recognition", which is a technology that scans the images and extract the information out of it. You can find more detailed information about OCR on internet but here our purpose is to copy the text from image so we are not going deep into it.

    Now lets start the tutorial, so the first thing we need is an OCR software. Don't worry about it, it is a free software so you can download it from any site on internet. One of the best OCR software that i know is FreeOCR, which is quiet small in size that is of few MBs and is relatively fast in scanning images, hardly it takes 2-3 seconds to scan an image and provides you the extracted text. So here i am giving you two links from which you can download this FreeOCR software:

    Link 1: Download FreeOCR software from Cnet. 
    or
    Link 2: Download FreeOCR software from Softpedia.

    Now i think you have downloaded the software, so simply install it and follow the step by step procedure describing the way to use the software to extract the text from image.
    • First download the image from which you want to copy the text.
    • Then open your FreeOCR software that you have downloaded.
    • Now in the software you will see the two square boxes or windows. One of which is showing the image and other box has some written instructions.
    • Clear those instructions from the right side window by using Backspace tab as shown in screenshot.
    • Now click on Open on the top left to open the image in the software.
    • Then select the portion of the image from which you want to extract the text as shown in screenshots.
    • Then click on OCR tab, it will give you two options : one is "OCR current page" and other is "OCR all pages".
    • Now its up to you which option you want to choose. 
    • Since i am using a single image to extract the text from the image, so here i am selecting the first option that is "OCR current page".
    • Now wait for few seconds and you can see the extracted text in the right side window of the software.
    • Now copy the text and use it wherever you want.
    Posted on 12:57 | Categories:

    Tuesday, 12 August 2014

    Simple Ways To Copy Content From Right Click Disabled Websites

    Copying content from internet is very common nowadays. Since internet is a huge source of knowledge we always keep looking for good contents that can help us in various fields. The reasons for copying content differs from person to person, as we all have different requirements. So in the quest of searching the best content for our projects or other works we sometimes reach a website that has good quality content that meets our requirements but the problem is that the content is protected by using some scripts that shows a message right click disabled by admin, whenever we try to copy it. Generally most of the bloggers protect their content by enabling a script that is a JavaScript code. So for copying the content from such websites we need to disable the JavaScript code using various methods.

    There are few easy ways that you can use to disable the JavaScript and copy the content from the website/blog.
    • By Using Proxy Sites.
    • By Disabling JavaScript in your web browser.
    • By Viewing the Source Code.
    • By Using Save Page As feature or CTRL + S feature.
    So these are the methods that we can use to copy the content from right click disabled websites. Here i am describing these methods one by one so that you can easily copy the content without facing any trouble.

    By Using Proxy Sites:

    Basically proxy sites are the sites that hide your I.P. address and let you visit the blocked sites. With these sites you can also open a website that is blocked in your office, school or college etc. These sites provide the feature of disabling JavaScript that you can use to disable the JavaScript of the website or webpage from which you want to copy the content. One of such great site is Hidemyass.com that lets you disable the JavaScript and copy the content.

    How to use a Proxy Site ?
    • Then scroll down the page.
    • At the very bottom of the page you will see a Go To Hide My Ass ! Proxy tab, just click on it.
    • Then you will be redirected to a new page. Again scroll down the page and you will see a search engine with tab Hide My Ass.
    • Enter the Website URL or Webpage URL from which you want to copy the content.
    • Then click on show advanced option and click on disable JavaScript as shown in screenshot.
    • Then click on Hide My Ass tab and then you can see the website from which you want to copy the content.
    • Since JavaScript is disabled so now you can copy the content.

    By Disabling JavaScript in your Web Browser :

    As i have already discussed most of the webmasters use JavaScript code to protect their content, so disabling JavaScript of the browser can solve your problem. In this tutorial i am gonna show you the methods to disable the JavaScript in commonly used browsers such as Mozilla Firefox, Google Chrome and Internet Explorer.

    So first let we start with Mozilla Firefox.

    How to Disable JavaScript in Mozilla Firefox ?

    Since Firefox has removed this feature from toolbox so we try a different approach for disabling the JavaScript.
    • In your Firefox address bar type about:config and press enter.
    • This will redirect you to a new page that will warn you, ignore the warning and click on the "I'll be careful! I promise" tab as shown in screenshots.
    • Then in the search box enter javascript.enabled.
    • Now you can see a similar code as shown in screenshot, select it from the list and press your mouse right click.
    • Then it will show you an option named Toggle, click on it and it will set the JavaScript field false that is by clicking on toggle you have disabled the JavaScript.
    • Now your JavaScript is disabled so open the website from which you want to copy the content and copy it.
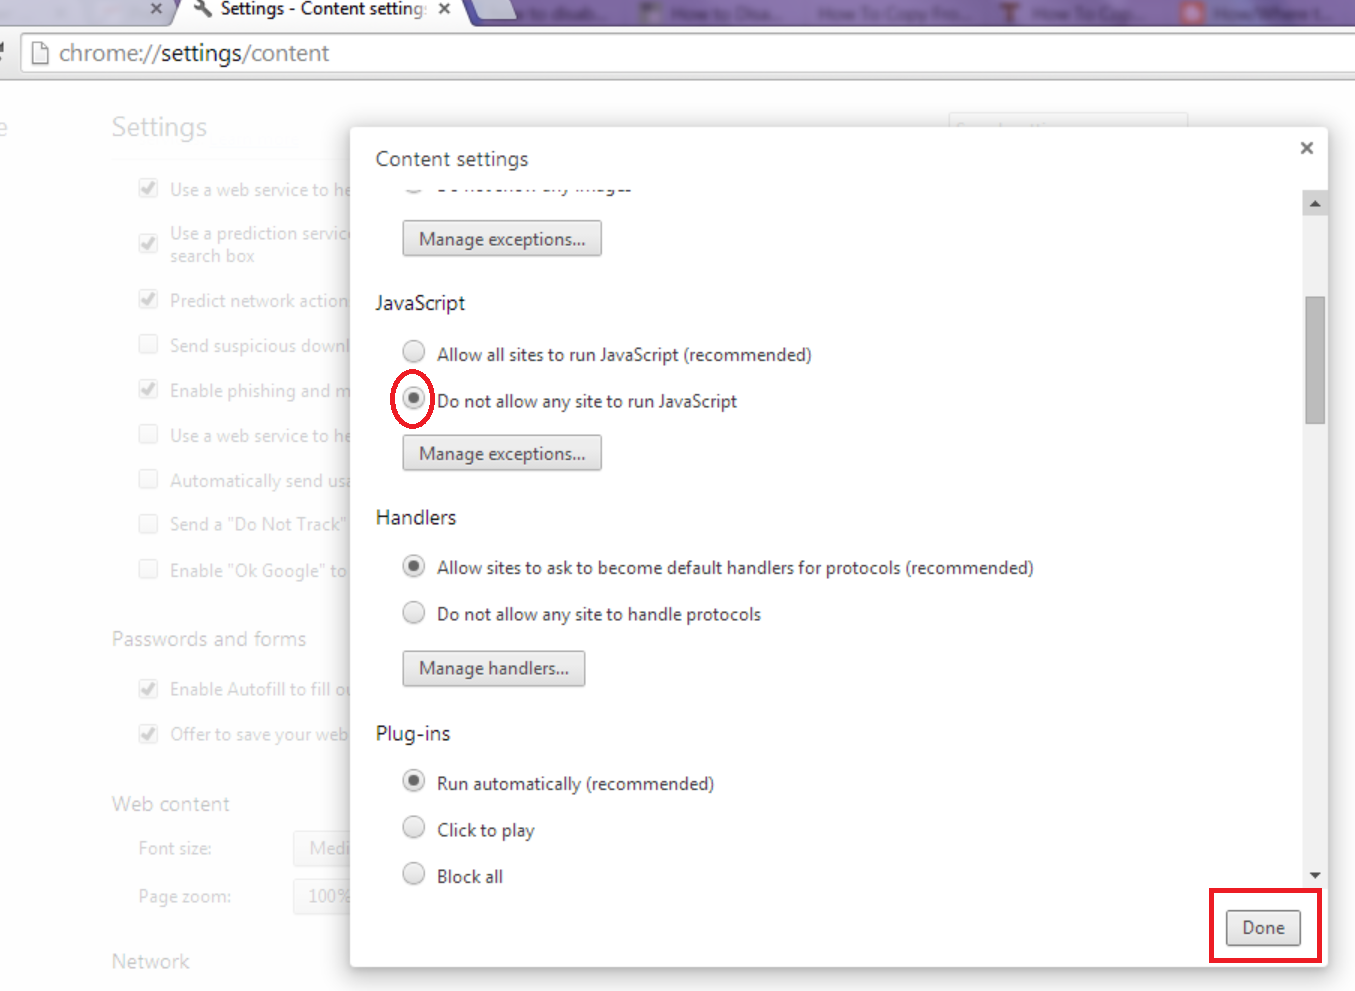
    How to Disable JavaScript in Google Chrome ?

    In Google Chrome disabling JavaScript is quiet easy.
    • Click on the toolbox symbol on the top right of your browser.
    • Then click on settings.
    • Then it will open a new page, scroll down the page and click on Show Advance Settings.
    • Then in Privacy click on Content Settings.
    • Now a new window will pop up, then search JavaScript by scrolling down.
    • Now fill the check box asking for Do not allow any site to run JavaScript.
    • Then Click on Done Tab and you are done.
     Or Alternatively you can use this approach:
    • Open the Google Chrome Browser.
    • In the address bar type chrome://settings/content
    • Then search JavaScript by scrolling down.
    • Fill the check box asking for Do not allow any site to run JavaScript.
    • Then Click on Done Tab.
    • Now you can open the website from which you want to copy the content and copy it.
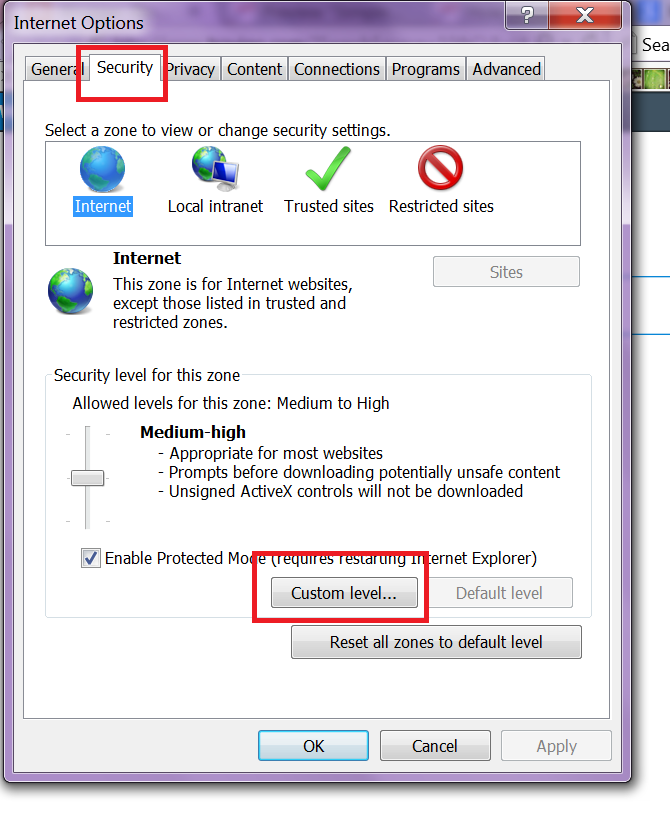
    How to Disable JavaScript in Internet Explorer ?

    Like Google Chrome, Internet explorer also allows us to disable JavaScript directly through settings.
    • Open your Internet Explorer web browser.
    • Then click on tools symbol or simply click ALT +X tabs.
    • Then Select Internet Options from the list.
    • Then click on Security >> Custom Level.
    • Now a new window will pop up, then search Scripting.
    • Then just below it you will find Active Scripting as shown in screenshot.
    • Then click on Disable then OK tab.
    • This will disable your Internet Explorer's JavaScript.
    • Now you can copy the content using Internet Explorer.
    By Viewing the Source Code :

    This is another approach of copying the text. You can use this approach if you have enough time to select the content line by line. This approach is one of the simplest approach but because we have to pick out the content out of code this approach may bore you. However it is a working trick so you can also try this.

    Generally whenever we want to see the source code of a website we simply right click our mouse and select View Page Source from the list. But since we have right click disabled simply click CTRL+U and you can see the source code.

    By Using Save Page As feature or CTRL + S feature :

    This is also a simple approach of copying the text from right click disabled websites. Many times we have used this feature to save the pages to print them later. Since right click is disabled you can press CTRL + S to save the page.
    • Open the website or webpage in your browser from which you want to copy the content.
    • Then press CTRL+ S.
    • Then a window will pop up asking you File name and Save as type as shown in screenshot.
    • Now change the file name as per your requirement and in Save as type select Text Files from the list.
    • Now you have the text file of the webpage, enjoy.

    Last words: I hope the above tutorial will sort out your problem. However, if the above methods don't work out for you then you can try this different approach.

    How to Copy Content From Right Click Disabled Blogs/Websites ?

    Posted on 13:39 | Categories:

    Monday, 11 August 2014

    How To Copy Content From Right Click Disabled Blogs / Websites

    Copying others content or simply plagiarism is not a good thing to do. It is always considered as unethical because owner of the post/article writes his/her article by giving his valuable time and effort. Although i do not recommend people to copy others content but still i am creating this post because people not always copy others blogs content for their own blog but there are many other reasons for doing this, such as students of various schools and colleges copy content for their projects that they have to submit to get good marks. Similarly different people have different reasons to copy a post/article. So i am creating this post for those needy people who try to copy content for legal purpose.

    In this tutorial i will show you a different approach to copy the content that you will not find on other blogs. This method is little lengthy but works for every website that has enabled script for protecting their content. So if you have tried other methods and are still not able to copy the content then you are at the right place. However if you want some other simple steps to copy the content from right click disabled websites then you can read this article that i have created for you:

    Simple methods to copy content from right click disabled websites.

    Since i am running this blog for around one year and i have seen many people asking me this question " How to copy the content of a post or article when right click is disabled by the post admin?". Personally many people have asked me this question because i also have a blog in which i have enabled a script that doesn't let people to copy the content from the blog. So in a month around 4 to 5 people ask me for allowing them to copy the content and they give different reasons for that. Mainly those people are school and college students and that is why i have decided to help them out.

    Copying content when right click is disabled is not a very hard thing to do. It is a very simple process but takes your some time. But as we know that for getting something we have to do some hard work. So now i have already discussed very much about copying content, without wasting your much time lets start the tutorial.

    Just a minute, before starting the actual tutorial i would like to give you an overview of what we are going to do. So for copying an article from right click disabled blog/website first we take the snapshot of the post/article that is we take the photo, image or screenshot of the article that you want to copy and then we extract the written information from that photo using a small software. Don't worry about the software that we are going to use for extracting information. The software is free and relatively small in size hardly about few MBs and also it is very fast in extracting information so it will not take your much time in extracting out the information from the image/photo.

    Now lets start the actual tutorial :
    • Open the article(that you want to copy) in your web browser.
    • Now as i have described earlier that we would take a snapshot of that article. So a new question arises.
    How to take a snapshot of the article ?
    • Click on [Prt Sc Sys Rq] tab of your keyboard. You can find this tab on the top right of your keyboard or you can see the screenshot given below describing the position of the tab.
    • Now, click on the article. If you are facing any problem in understanding this then simply see the below screenshot.
    • Then open the Paint and press CTRL + V or simply right click your mouse and select paste.
    Note: If you are not still facing trouble in taking screenshot then simply take out your mobile from your pocket and take a photo of the page you want to copy.
    • Now you can see the photo of the article in paint.
    • Then remove the extra content that you don't want by cropping the image and then save the image.
    After removing the extra content my screenshot look like this.
    • Now you have the image that has the required information.
    Next Step: Downloading the software :

    Before giving the link of that software i would like to describe you something about this software. Basically this software is an OCR that is Optical Character Recognition. The work of this software is to read the image and extract the written information from the image.

    Now you can download this software by clicking this link - Download Free OCR
    or you can use this link - Download Free OCR

    This software is very small in size so i don't think that you would face any trouble in downloading it.
    • After downloading the software. Simply install it in your PC/ Laptop.
    • Now open the software.
    • Then clear the instructions that are written on the right side of the software as shown in screenshots.
    • Now click on open as shown in screenshots.
    • Then select the image that you have saved in earlier steps and click on open tab as shown in screenshots.
    • Now select the portion of the image from which you want to extract the information as shown in above screenshots.
    • Then click on OCR and select OCR current page from the list or start OCR process.
    • After 2 or 3 seconds you can see the required content on the right side of the software.
    • Copy it and use wherever you want.

    Saturday, 26 October 2013

    Add Meta Tags To Blogger For Better SEO

    What are Meta Tags?

    Meta tags are special HTML tags that provide information about a website. Meta tags are different from the normal HTML tags in the sense that normal HTML tags are generally used for changing the appearance of a web page whereas meta tags describes the details of a website or web page such as the author of the web page, keywords of the web page, how often the website is updated etc.

    Most of the search engines use this information while building their indices. Meta tags tell search engines and users what your site is about. There are various types of meta tags but the meta tags that are important for search engines are Keyword and description meta tag. A keyword meta tag is used to tell the search engine about the keywords that best describe your site. The description meta tag is used to show a small description about your website to both search engines and users. Both the keywords and the description are used by search engines in adding a page to their index, so if you have not already added these two tags in your website or blog then add it now.

    How to create a meta tag ?

    Creating a meta tag is quiet easy thing because there are many websites available online where you can automatically generate meta tags for your blogs or website.

    You just need to follow the simple steps to add meta tags to your blog:
    • Go to SubmitCorner 
    • Then choose which meta tags you want to generate for your blog. By default there are three ticked options, they are description, keywords, robots, which are most important meta tags but if you want to add other meta tags then there are other options too like author, abstract, copyright,language etc.
    • After selecting your required keywords, click on Proceed tab.
    • Now you are taken to the meta tag generator page.
    • Then enter your keywords and make them separated by commas, description, author name etc. 
    • Now click on Generate my Meta tags tab and copy the generated meta tags.

    Before adding these meta tags to your blog or website i would like to recommend you placing your meta tags in between these two codes.

    Example:

    <b:if cond='data:blog.url == data:blog.homepageUrl'>
    Place Your META TAGS here
    </b:if>
    I am telling you to place your meta tags in between these codes because if you do not place your meta tags in between these two codes then search engine robots would start thinking that all your pages are having same description. So to avoid this situation put your Meta tags in between these two codes.

    After placing your meta tags in between these codes, copy the entire code and now you are ready to add your meta tags to your blog.

    How to add Meta Tags to Blogger ?

    • log in to your Blogger Account.
    • Go to Dashboard >> Template >> Edit HTML.
    • In edit HTML section press Ctrl + F and search <head> code.
    • Then paste your code just below <head>.
    • Now save your template and you are done.

    How to add meta tag to a website ?

    • Search opening <head> tag and place the meta tags just below it. 
    Also read: